You want an API and you want it now! What if I tell you that your API is just minutes away? Using the express-generator we will be able to get a Node/Express API up and running in no time. What I will cover in this post is:
- Install and setup a NodeJS API using the ExpressJS framework.
- A look at the code, what exactly is happening?
- …profit!
Install and setup
Setting up and running an API is both quick and easy using the NodeJS framework ExpressJS. Here is how.
First of all, make sure that you have NodeJS installed. Simply go to their web page: https://nodejs.org and download it. We will be using the express-generator to quickly set up our API skeleton. Open a command line and install the express-generator by typing:
npm install -g express-generator
As a side note, appending -g means the express-generator is installed globally. You might need administrator privileges for it to work. On Linux systems you can do this by prepending sudo on the install command above. On Windows, make sure you run your command line application (whether it is PowerShell or cmd.exe) as an administrator.
Next, create your project folder and cd into it:
mkdir myApi
cd myApi
Using the express-generator we installed previously, we can create our ExpressJS API skeleton. Notice that we append –no-view since we don’t want any view engine for our API:
express --no-view
Before running it, we need to install the local dependencies for our application:
npm install
Congratulations! Your Express API skeleton setup is complete. Serve it from your command line by typing:
npm start
Open a browser and go to localhost:3000. You will see the default “Welcome to Express” page.
By default, there is a /users endpoint already set up. To try it in your browser, go to localhost:3000/users. You should see the text “respond with a resource” being displayed.
Let’s look at the code
Awesome! Lets take a look at what is really going on here. Now is a good time to open up the project in your favorite editor. I have Visual Studio Code installed, so I will open the project using my command line:
code .
Your project structure should look like this:
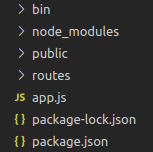
node_modules
The specific content of this folder is not too important to pay attention to. Suffice to say that this is where the npm package manager puts all the local dependencies of this application. When a dependency is installed and available in the node_modules folder, it is possible to require() that dependency from your code.
package.json
Let’s look at the package.json file. The most important properties are scripts and dependencies.
The dependencies property simply list all the dependencies the project has. Earlier when we typed npm install, the Node package manager read this list and installed it one by one. As mentioned, these dependencies were installed in the folder node_modules.
The scripts property defines all scripts you can run for this project. Only one script is defined now, start. As we can see, this will execute the content of the www file in the /bin folder. This is what we did previously when we typed npm start. Lets take a quick look at the www file.
/bin/www
The /bin/www file is the entry point for our API application. We will likely not need to modify this as we build our API, but it’s always good to know what’s going on in our project. Basically, what this does is to create a server based on our app.js file located in the project root, and start serving it on port 3000 by default.
app.js
Moving on to the app.js file. There are a couple of things going on here. First some imports of dependencies being used, including our routes, which we will come back to. Then the express framework is launched with
var app = express();
After this express loads up all necessary functionality like logging and cookie handling. Last, our two routers are loaded and attached to the root path /, and /users path respectively:
app.use('/', indexRouter);
app.use('/users', usersRouter);
/routes
The /routes folder contains our routers. We have two routers set up and loaded from the app.js file. We can see that the indexRouter is used on / and the usersRouter is used on /users.
Looking at the index.js file containing the indexRouter, we see that when this router is called (by some client requesting the url localhost:3000/) the router renders the index.html file found in the /public folder. This is what we saw in the browser earlier.
Looking at the users.js file containing the usersRouter, we see that when a client requests the /users endpoint, it will simply respond with the text ‘respond with a resource’. We also saw this in the browser earlier.
/public
The last folder is the /public folder. From the project structure we can see that this is where we keep our views, stylesheets and images. If your are using this project as a REST API and don’t need to render html, this folder is not very important and should probably be deleted to keep the structure clean.
Conclusion
That’s it! Next we are adding Swagger to our project. Adding Swagger is a good way of documenting our API and we can also use it to test our endpoints.